One of my new favorite obsessions are cake pops!
So this Christmas I got a lot of tools to make them and now I have made them many times. There are two different kinds of cake pops you can make. The first kind requires a cake pop maker (like the one I have). Using this method here's how I did it:


 I usually make cake box mix, but you can make your own (either way doesn't affect it). Then I would recommend putting the batter in a large ziplock bag. You don't have to but it will make the next step easier.


The other method of making cake pops is making them without a cake pop maker.
So this Christmas I got a lot of tools to make them and now I have made them many times. There are two different kinds of cake pops you can make. The first kind requires a cake pop maker (like the one I have). Using this method here's how I did it:


Here is my cake pop maker and the cooling tray that came with it.
- Make the batter.

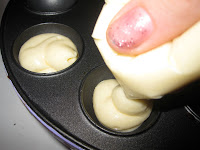
2. Fill the cake pop maker.


In my cake pop maker, you can make twelve at a time. You have to move pretty fast when filling it because the cake pop maker is really hot so you don't want them to cook unevenly. Using a ziplock bag will be easier because it's faster than taking a spoon and filling each one up. If you are using a ziplock bag and do not have a lot of experience with it or even if you are, I would recommend putting a rubber band or a clipped thing at the top because the batter is very runny and the top may open causing the batter to pour out.
3. Cooking the cake pops.

Then you will wait about four to five minutes for the cake pops to be ready. I also recommend not opening it within the first two minutes, otherwise the cake will separate because the top will stick to top top half and the cake pops are ruined.
4. Cooling the cake pops.


To take them out you can use a fork or your hands and set them on a cooling rack or sometimes the cake pop maker comes with a cooling stand. After taking them out, I would put them in the freezer to cool. A little bit before the next batch is ready, pull them out and put them in an airtight container. You don't have to put them in the freezer, but it just cools them faster.

Once the cake pops are cooled off you can dip them in candy coating melting.
The other method of making cake pops is making them without a cake pop maker.
For this you are going to make a cake, however, you want to crumble the cake into really small pieces.
Next, you will add frosting, but start out adding really small amounts. You may think you will need a lot, but even I was surprised because I really didn't.
Add the frosting and stir until the cake and frosting mixed together to form a dough. You will know if you added the right amount of frosting because if you added to little the dough will fall apart when you try to form it, so just add more and stir it in. If you added to much it will be really sticky, so if you can add more cake, otherwise just keep going cause there isn't anything you can do and it won't ruin the cake pops, but that's why add less frosting in the beginning and then keep adding. The cake should be easy to shape. You are going to mold the cake pops into whatever shape you want and set them on a cooking sheet.
Then freeze them for about an hour and they are ready to be dipped!
Both ways taste really good, in my opinion! The ones with frosting are really sugary, so if you are someone who doesn't like that then I would recommend the other ones, because I have heard that some people don't like the frosting ones.
Also, be fun with the flavor you use in the second method! You don't have to use white cake with white frosting or chocolate cake with chocolate frosting.
Finally, you can decorate the cake pops once you dip them. You can dip them in the candy coating, then dip them in sprinkles, and (if you want) use fondant to add decorations to the cake pops.
I will cover cake pop decorating details later!