Tuesday, August 7, 2012

easy letter art!!

I was looking up some fun letter art and i found a really cool picture. Of course now I can't find that picture, but it looked a lot like the one I'm about to show you, just a different letter.
The photocopy with color.
So this was super easy and looks like you spend a lot of time and detail on, but you don't!
So the first thing I did was print of a huge letter M. You can either look some up on the internet or use a word document, with a font you like. Remember though whichever font you use has to be pretty thick because you will be drawing small details inside. Then I cut it out and traced it very very lightly onto another piece of paper. Now this will be your final piece of paper so you could use a nice thick on, but I just used printer paper because I couldn't find any other and didn't know how it would turn out. So then I just started to draw. This is the really fun part and it looks like you need a lot of artistic ability, but you don't! Just draw random shapes, honestly. You can look at mine for ideas and then fill in your own letter. Now I used pencil for this because I thought I might want to erase some things and then I went over it again with a really thin point black pen because sharpie was to think, you might be able to tell if you look at the black and white one in the upper left corner. I  did that after I was finished and liked how it looked. You can do that if you have the time, but it is fine if you don't. Then erase all the pencil lines. After I did that I liked the way it looked of the black and white, so I actually photocopied it, so I could keep the original and drew on the photocopy. Also that helps if you didn't erase all the pencil lines because the photocopier won't pick up the really light lines. Then I grabbed my color pencils and started to draw in the shapes. I tried to make sure that I never drew one color to close together. Then you are done and it turns out really cool because You may not like it close up, but When you hang it up and stand a few feet back it looks really amazing! Here is the black and white version.

My first one that is just black and white.


Sunday, July 29, 2012

The most delicious cupcakes ever!!

chocolate and peanut butter. the best combination ever.

These cupcakes are so amazing.
They have a peanut butter cup baked in at the bottom, dark chocolate cake, whipped peanut butter frosting, oh and yeah and they are dipped in chocolate. Like I mentioned the best cupcakes!
So one day I was really bored and felt like making some cupcakes. I really wanted to make marshmallow frosting, but i didn't have the ingredients for it, but then i saw a recipe for hi hat cupcakes and thought those are so cute and look amazing. But of course the recipe looked pretty complicated, so I didn't want to make that. Then I looked for recipes with reese's cups baked in because we had those in the house. That's when I found the best recipe. The recipe is called Double-Decker-Reese's-Peanut-Butter-Cup-High-Hat-Cupcakes. This was the first recipe I found and it was pretty ironic that just I found a recipe with reese's cups baked in and hi hat frosting without even trying! I felt pretty lucky! So I decided to try them out and let me tell you it was worth it. Also they were pretty easy! First I made dark chocolate cake mix, I was feeling lazy. Then I put peanut butter cups at the bottom and filled the batter on top and baked them for the normal time. After I made the frosting. This is the most difficult part, but don't worry, don't freak out, they weren't too hard and were delicious!! So the recipe calls for egg whites and you must be thinking, you can't have egg whites in frosting! Well don't worry because you put a metal bowl over a pot of simmering water and whisk the egg whites and sugar together, so the heat kills the bacteria, so they aren't raw eggs. Now the recipe says it takes 7-10 minutes, but mine took a little bit less than that, probably like 5 minutes. Then you take the bowl off the pot and set in on the counter and use an electric mixer to mix it for 7-10 minutes, but again mine took around 5 mintues, and my bowl was still a little bit warm after I finished, unlike the recipe where it says the bowl should be cool to the touch after. Once thats done it's really easy from there!! But my tip for the frosting is to get the ingredients all ready before you start because there isn't a lot of time to do it. So here is link to the recipe and pictures http://www.bakeaholic.ca/cupcakes/double-decker-reeses-peanut-butter-cup-high-hat-cupcakes/

Thursday, July 19, 2012

my new room!!

I have decided to redo my room!! I am very excited because I am tired of my old aqua room. I want to do a really fun bright room and when I was looking I found this picture.

I decided this is my dream room! So this week I have been busy painting my room. yay. I am painting it white with the bottom third yellow, just like in the picture. I already bought a white quilt for my room, so I can't change that to yellow, but I am going to add really fun bright pillows. So my bed is in the corner and next to the top of the bed is my window, so on the wall on the side of my bed, I am going to do a gallery art wall!! This I am really looking forward to! I am going to make a ton of new diy wall art and hang it up! And I will show you how to do each piece once I start! I have a lot of other ideas which I will explain after my room is done! I'll post a couple pictures and show you how I did everything. Now I realized as I am writing this I wish I could do a before and after picture, but of course me being me, forgot to take the before shot before I started painting, so i'll just show you the after! Here's the playlist I have been listening to while painting: On top of the world- imagine dragons, it's time- imagine dragons, demons- imagine dragons, down- mat kearney, gotta be wrong sometimes- O.A.R., love and memories- O.A.R. love these songs!! I also watched, well more listened to, GILMORE GIRLS!! my favorite show! Well I also love a few other songs, but this show is so good! ahh i love it!!

Sunday, July 15, 2012

Summer Chevron Nails

So I decided to paint my nails today! I looked on my pinterest boards and decided to do a version of these.

Now I clicked on the picture, but of course it was just a picture and no directions, so I made my own! I started with painted my nails gold I used essie "As gold as it gets" and painted many coats because it is pretty thin. Then I wanted to do summery colors, so I picked Sonai Kashuk "Making Wave" and OPI "I'm Indi-A Mood For Love". Then I just used tape to make the chevron pattern.


Wall Art Quote


I was feeling really bored and I found this quote "To live a creative life we must lose our fear of being wrong". I just love it and really want to paint it on my wall when I redo my room but because I haven't done that yet and I really wanted to do something with this quote I decided to paint it on a canvas board! I used an 8x10 canvas from Michael's. First I traced all the letters onto some painters tape. Then I used a craft knife to cut the letters out, all while rewatching How I Met Your Mother. I'm so excited for season 7 to come on Netflix!! I lined all the letters up and taped them down. Then I painted the bottom half yellow and the top an aqua blue color. Then I painted a white strip in the middle with my fingers! It was actually really fun and I just dabbed the white over the colors to get a cool texture! After I took a strip of painters tape and taped a paper towel to cover the white and yellow part and then I splatter painted to blue part. I dibbed my thumb in a color and then flicked it using my first finger. After I pulled of the tape fixed a few of the letters and ta-da!!


Monday, January 23, 2012

Cake Pops!! :)

One of my new favorite obsessions are cake pops!

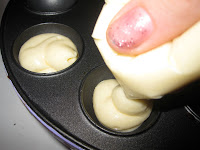
So this Christmas I got a lot of tools to make them and now I have made them many times. There are two different kinds of cake pops you can make. The first kind requires a cake pop maker (like the one I have). Using this method here's how I did it:
Here is my cake pop maker and the cooling tray that came with it.
  1. Make the batter.
 I usually make cake box mix, but you can make your own (either way doesn't affect it). Then I would recommend putting the batter in a large ziplock bag. You don't have to but it will make the next step easier.


    2. Fill the cake pop maker. 


In my cake pop maker, you can make twelve at a time. You have to move pretty fast when filling it because the cake pop maker is really hot so you don't want them to cook unevenly. Using a ziplock bag will be easier because it's faster than taking a spoon and filling each one up. If you are using a ziplock bag and do not have a lot of experience with it or even if you are, I would recommend putting a rubber band or a clipped thing at the top because the batter is very runny and the top may open causing the batter to pour out.

    3. Cooking the cake pops.
Then you will wait about four to five minutes for the cake pops to be ready. I also recommend not opening it within the first two minutes, otherwise the cake will separate because the top will stick to top top half and the cake pops are ruined.


     4. Cooling the cake pops. 

To take them out you can use a fork or your hands and set them on a cooling rack or sometimes the cake pop maker comes with a cooling stand. After taking them out, I would put them in the freezer to cool. A little bit before the next batch is ready, pull them out and put them in an airtight container. You don't have to put              them in the freezer, but it just cools them faster.
Once the cake pops are cooled off you can dip them in candy coating melting.


The other method of making cake pops is making them without a cake pop maker.
For this you are going to make a cake, however, you want to crumble the cake into really small pieces.
Next, you will add frosting, but start out adding really small amounts. You may think you will need a lot, but even I was surprised because I really didn't.
Add the frosting and stir until the cake and frosting mixed together to form a dough. You will know if you added the right amount of frosting because if you added to little the dough will fall apart when you try to form it, so just add more and stir it in. If you added to much it will be really sticky, so if you can add more cake, otherwise just keep going cause there isn't anything you can do and it won't ruin the cake pops, but that's why add less frosting in the beginning and then keep adding. The cake should be easy to shape. You are going to mold the cake pops into whatever shape you want and set them on a cooking sheet.
Then freeze them for about an hour and they are ready to be dipped!

Both ways taste really good, in my opinion! The ones with frosting are really sugary, so if you are someone who doesn't like that then I would recommend the other ones, because I have heard that some people don't like the frosting ones.

 Also, be fun with the flavor you use in the second method! You don't have to use white cake with white frosting or chocolate cake with chocolate frosting.

Finally, you can decorate the cake pops once you dip them. You can dip them in the candy coating, then dip them in sprinkles, and (if you want) use fondant to add decorations to the cake pops.

I will cover cake pop decorating details later!


Crayon Art

I found a couple websites on how to do this and decided to try it as well. I forget to take photos while I was doing it so I only have the finished products but here's a link to one of the websites http://www.52kitchenadventures.com/2011/09/12/melted-crayon-art-tutorial/ This is exactly how I did mine even with the same hair dryer. I made two different ones, so here is how I did it.
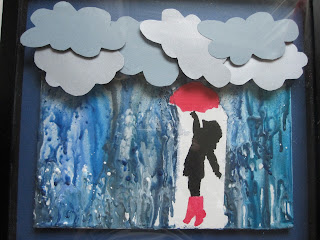
 On my first try I didn't realize it needed to be the same brand so I used different types. Some brands melt faster than others, so some weren't melted at all while other crayons were completely melted. I decided to cover up the crayons with blue and gray clouds out of paper because they didn't look good. I also found a picture of melted crayon art except they only used blue and gray crayons to make it look like rain and had a boy and girl standing under the " rain". I loved that idea, but wanted to change it a little so I found a picture of a young girl under an umbrella, printed it off, and traced it onto the blank canvas. Then I covered it up using yellow masking tape and made sure to make it seem like the umbrella was covering the girl so the rain wouldn't hit her.

Here's the link to that picture http://www.superstock.co.uk/stock-photos-images/4137R-2811 Then I glued and melted the crayons. After I pulled the masking tape off ( don't worry it came off really easily) I painted the girl black so it was a silhouette except I painted her umbrella and rain boots hot pink so they stood out. Now I loved doing that one so much that I wanted to make another, but I didn't do the rain instead I made a rainbow. Before I did that I first painted my canvas black then put a quote from one my favorite songs " So don't be afraid to let them show, your true colors are beautiful like a rainbow". I wrote that in a silver sharpie and then covered it up with the masking tape.